Home improvement

Do not have a basement, and I’m in tornado alley. Hasn’t really bothered me for the 26 prior years living here, but between Covid, the riots and summer storms, I’m all fucked up with anxiety lmao. Looking to make a tornado shelter/safe room in my garage.

Believe I have ample space to accommodate my car and like a 4’ by 6’ room. Any body have any ideas?

I’d enjoy trying to engineer it myself and with the forum’s help! Was thinking maybe cinder blocks that receive rebar (short for reinforcing bar!) I’d drill the concrete garage floor with a rotary hammer, then cut the rebar to the desired length, and then anchor the rebar in place with an epoxy or is concrete sufficient? 2 cells /cores per cinder block, so I’ll stagger them for each level of strata, and they’ll alternately receive the rebar, then all be filled with slurry as the mausoleum safe room rises!

I’m hoping it’ll be fit to withstand 200 mph wind, and not be King Riv’s Tomb and final resting place.

I’d want the door to hinge inward, so I wouldn’t find myself trapped under debris and unable to open it, and it would need to be of stout composition/ constitution, the door. I know that much little

So, watcha all think?

You might start here:

https://www.fema.gov/sites/default/files/2020-07/building-safe-room-home-small-business.pdf

The door is gonna be super spendy, and heavy like nine kinds of hell. I do think an inswinger is the better choice. Throw a mattress in there, in case you’re feeling romantic. Or an inflatable doll if you’re feeling romantic and you’re all alone.

Good luck!

1 Like

Our central air unit kicked the can. Seems to be a coolant leak. We had a tech out a few weeks ago to add coolant after it stopped working, now it’s not working again and the coils are frozen so probably a leak there.

In any case, it’s 13 years old so we don’t mind getting a new one. Problem is I have no idea how much it should cost, and HVAC places are reluctant to give quotes over the phone. The guy that came out to add coolant quoted me something outrageous like 15-18k to install a new unit, which is like 2-3x what google tells me.

This is for like a 1400 sq foot rowhome, AC is on ground level. Anybody have experience or advice here?

A lot of the biggest ripoff paper contractors I’ve come across did AC. My only advice is the same for all residential home improvement: deal directly with a contractor who gets their hands dirty and not a salesperson.

3 Likes

I did a similar replacement a couple years ago for $4k, could’ve been $3k with a lower end unit. That was for the evaporator inside and compressor unit outside. It was only the compressor that broke but the old system was R12, had to do both to switch to R134a. Also that wasn’t a particularly great price. Slightly smaller home though. You’re in Baltimore right? I have a friend who renovates enough houses there to have found some pretty cheap contractors. I can get a contact if you want.

2 Likes

Yeah, Baltimore. If you want to PM me with a recommendation that would be very much appreciated. Thank you!

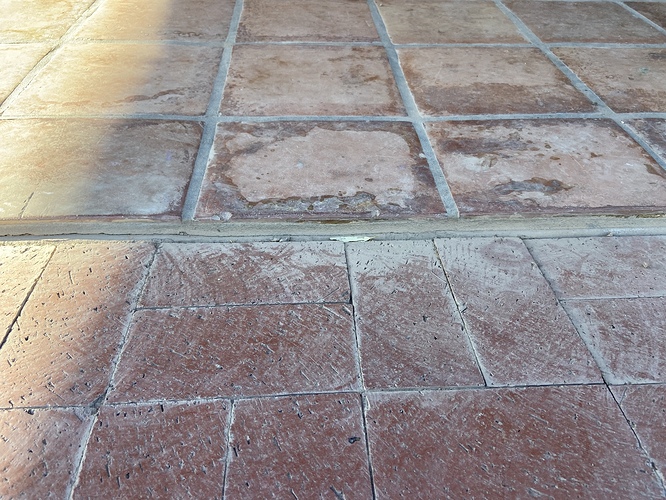
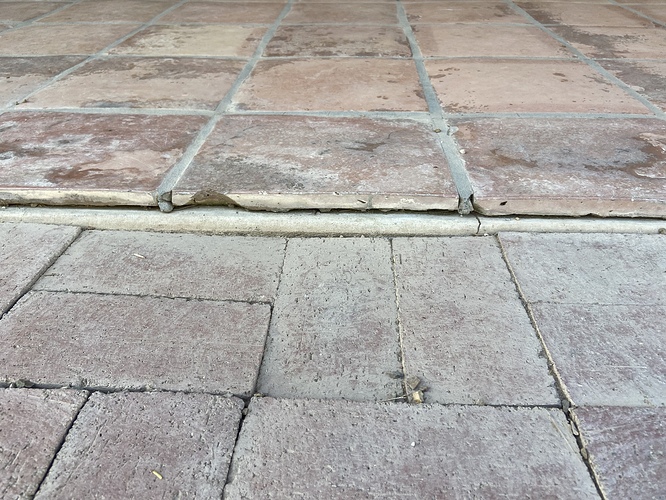
Ok so it looks like I may have to do some outdoor grout work and I have no clue where to start; my natural inclination is to hire someone but I hear it’s pretty easy to do yourself. The first image should be the good sealed grout while the second one is the damaged area - basically water is seeping underneath it and then pooling in the area. Do I just buy some grout, a bucket (mine are al cracked) and a grout gun and go to town?

Also while I’m here, my glass door to the outside is squeaking like crazy. I put WD-40 on the tracks but it doesn’t seem to have helped. Is there somewhere else the sound can be coming from? Someone replaced the wheels on it for me a couple years back.

“grout gun”? That’s a trowel kinda thing there. And no amount of grouting is going to make those bricks come up flush with those tiles.

I’m just taking a stab at glory before someone who knows comes in and tells you, but the real solution is pry up the bricks and use sand to make it all level and flush. The “it’s good enough for me” solution is maybe concrete or mortar rather than grout and try to make as smooth a transition as you can. Or I guess just shove grout in the gap.

1 Like

Grout is never going to last long in an application like that, nor is it going to do much to keep water from getting under there. I’d caulk it with a good concrete sealant like Sikaflex. You’d find that in the concrete/masonry section of a big box store, not the paint section. Don’t use the self-leveling kind for that kind of joint.

Squeaky door might be plastic frame rubbing on something.

1 Like

Me and microbet are talking about different things. The pooling is likely because of the dip in the pavers and you’d need to do what he suggested if you wanted to fix that.

1 Like

Thanks! Just the answer I needed. As for the bricks I am not planning on messing with those unless I have to - seems like it might be above my pay grade. Door seems to have resolved on its own, idk.

If you’re going to try tackling it yourself I’d strongly suggest masking the joint area with blue tape, using a caulk tool, and doing a couple trial runs somewhere other than your patio. Urethane caulks are very sticky and behave differently than water based or silicone ones.

Is this something that you wouldn’t recommend to amateurs? I know a guy who could probably fix the patio and the brick pretty reasonably and I’m always concerned I’m going to screw something like this up.

I don’t know if you can screw it up exactly, but you can definitely make a big mess that you have to clean up with mineral spirits. Have you done caulking before?

A tube is only like $7 iirc. Grab one and test it out on some scrap. You should be able to decide pretty quickly whether or not you want to proceed from there. Grab some mineral spirits while you’re there too, just in case.

Update… Against all advice I went ahead and wired up my old school surround sound. Took a week of work, only a few hours per day of labor but the mental energy I put into it was constant. All worth it though.

TL;DR install details: The spot I was going to go in through the basement ceiling light kind of worked/kind of didn’t. I opened up around the mount hoping to drill back a couple feet from there. There was a block in the way though. I was still able to open up another hole on the other side of it that will be covered by the light, but like the edge of the light that kind of floats a cm below the ceiling. The first hole would’ve been entirely covered flush by the light’s metal mounting bracket. So not as good but better than patching uncovered ceiling. I checked for blocks going the other way (the direction I needed to run the wire) and it was clear as far as I could see, so that was encouraging.

I was also fortunate that I have a water heater closet on the other side of the basement where I need to run wires back up. The ceiling there isn’t finished. The spot I needed to drill was outside of the closet, about 30" back over top of the finished part of the ceiling, so I technically had access but actually pulling it off required squeezing between joists and drilling about an inch at a time because there were water pipes in the way of the drill. Successfully nailed both drilling spots dead center into wall though, no holes punched into trim or floor.

Put a hole into the wall into the correct stud bay behind the AV receiver. Previously mentioned: to go over the light in the basement I had to put it off center on the wall, so I put it as close to center as possible up near the stud. And after I got the hole opened up there was a PVC drain pipe sitting there right in the middle of it. I was making shallow cuts so it wasn’t damaged but I’d never be able to get a full sized junction box in there. Shallow box + 90 degree RCA adapter for the sub worked but I was annoyed with myself for making it difficult because I knew that pipe was there.

Started fishing wires under the floor and had a brief panic when I couldn’t get the fish tape from the water heater closet to the hole at the other side of the ceiling, thought there was another unseen block in the way. I used my phone camera to look up into the hole from the other side and couldn’t find the fish tape anywhere. After resigning myself to the thought of putting another hole in the ceiling I started super exposing the picture I had taken to estimate where the next block was, and noticed a slight discoloration in the exact spot I had drilled through the block above the water heater. I waited until night and used a flashlight to confirm that it was in fact the hole I drilled, so my tape was just getting stuck and hidden on something else. Put some more effort into working it through and eventually got it to the other side.

Put a hole in the back side wall next for the rear speaker/sub hookups. After that was done I noticed there was no drywall on the back side of the wall on the left, it was mostly open for running up HVAC ducting. That got me thinking that I could run a wire direct to the left surround speaker instead of putting everything out in one central spot then running wire outside of the wall. I had previously given up on that idea because the left side in the basement was fully inaccessible due to the HVAC ducting there. The right side was blocked with standard wall studs and drywall on both sides of them but that side would be accessible in the basement through the water heater closet.

So I figured out where I wanted to mount my speakers to the wall and cut another hole for the left surround speaker. Quickly confirmed that there was in fact a path from that hole down to where I had wires run. Running fish tape all the way there was effectively impossible though as it would need to make multiple turns and get through some very tight gaps. After some effort I got it down into the neighboring stud bay but too far to reach through and pull out. Put some more effort into it and lost it. Took me almost an hour to get it back. Spent some more time trying to get it through the last foot or so more carefully but eventually caved. Cut another hole in that stud bay to help fish it through. It’s at the bottom of the wall behind the couch and I kept it to a standard junction box size, so there’s just a block off plate that no one will ever really see there now.

Cut a hole for the right surround speaker and another access hole through the basement to get into that stud bay. And then I ran into a fire break. Actually I think I knew it was there from checking earlier but not after I was already committed. Considered investing in a long flex bit to get through it but then I’d still have trouble fishing blind between two 1" holes 4 ft apart. Didn’t want to put another block off plate on the wall cause it was starting to get crowded. So close to finishing and feeling frustrated I YOLO’ed and cut a hole right at the fire break. I had already bought stuff to patch the ceiling, might as well use it on the wall too. And if I can’t get it right I’ll hire a professional to do it.

Patching took several days. I sanded off most of what I put on and reapplied maybe 6 coats trying to make it perfect. Didn’t have any matching paint so I took one of my several wall cut outs to get a perfect match. Of course it never is. I learned a lot about drywall patching and painting while waiting for my patches to dry. Common advice was you’ll never match old paint, gotta repaint the entire wall if you don’t want a patchy shade. This wall was only 70 sq ft and almost entirely square and rollerable so I did that.

And then finally after a week of work, I finished off the wall terminals, hung speakers, finished off wiring and tested them out. Probably should’ve done that earlier as the whole system had basically been sitting unused for the past 10 years. Works good though, and my wall patch looks flawless (TBD if it ends up cracking in 6 months). The basement still has holes in the ceiling but I’ll get to that later.
3 Likes

any idea on price ranges to get vinyl siding? Like our home has masonite, we bought the house 7 years or so ago, was fine, the chimney is all fucked up and rotting now though and some spots on the front of the house as well. We got a quote to repair it all for like $4500, i think about 500ft? i was originally just thinking about redoing the whole exterior with vinyl, any thoughts?

I rarely do siding so I can’t give you a ballpark, but you can’t get anything cheaper than a basic double 4 vinyl and as long as it’s installed correctly it’ll last basically forever.

Masonite is hot steaming garbage for siding and never worth repairing. All you’re doing is buying a few years before you have to fix it again. There’s a reason why they got hit with a bunch of class action lawsuits and nobody uses it anymore.

1 Like

yea pretty much my thoughts, we already asked for a full quote to do siding everywhere.

we got a full quote but its for hardie board, which apparently is mega durable but much more expensive, looks like we could get vinyl siding for like 2/3 the price probably? I’m thinking vinyl is way to go and also I really really doubt I’m in this house for anymore than another 10-15 years max.

also side topic: my wife kinda wants to move but its psychotic to sell now and then buy again right or am i crazy?

We bought the house in 2012ish so it was basically bottom market value and i would imagine its close to top market value now, but to sell the house now and then buy another at top market value? ehhhhh

I pretty much told her we could if we bought one much cheaper than what ours would sell for right now.

If you’re buying and selling at the same time, and in roughly the same price range, I don’t think it matters where you are in the market. There’s really no difference between, at the top of the market, selling for $350K and buying for $375K, vs at the bottom selling the same house for $250K and buying for $275.

ETA: I’m neither an investor nor a real estate guy, so I probably don’t know what the hell I’m talking about.